
はじめに
前回の記事では、Puppet環境の構築から仮想マシンの基本設定を行うマニフェストの実行まで解説しました。今回は、LAMP環境を構築するマニフェストを作成し、プロビジョニングを行う方法を解説します。
Apache環境の構築
Apacheをインストールするマニフェストを作成し、Apache環境を構築します。
- マニフェストの作成
Apacheのインストール設定マニフェストを作成します。
$ vi manifests/httpd.pp
# パッケージインストール
package { "httpd":
provider => "yum",
ensure => installed
}

# httpd.conf設定
exec { "httpd.conf_1":
command => "/bin/sed -i -e 's|^ServerAdmin.*$|ServerAdmin $admin|' /etc/httpd/conf/httpd.conf"
}
exec { "httpd.conf_2":
command => "/bin/sed -i -e 's|^#ServerName.*$|ServerName $myfqdn:$httpport|' /etc/httpd/conf/httpd.conf"
}

# サービス起動と自動起動設定
service { "httpd":
  provider => "redhat",
  enable => true,
  ensure => running,
  hasrestart => true
}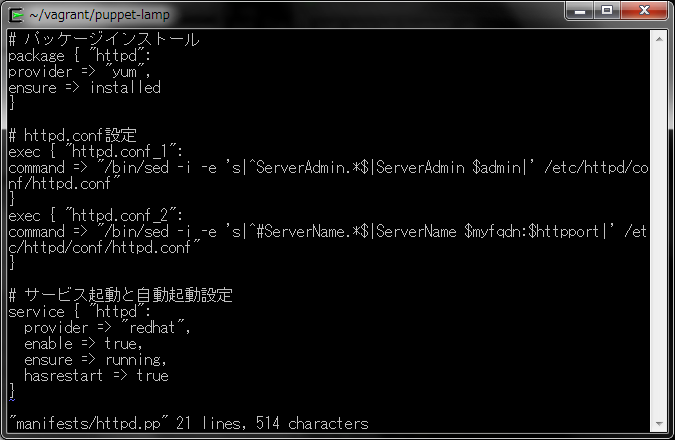
- マニフェストの指定
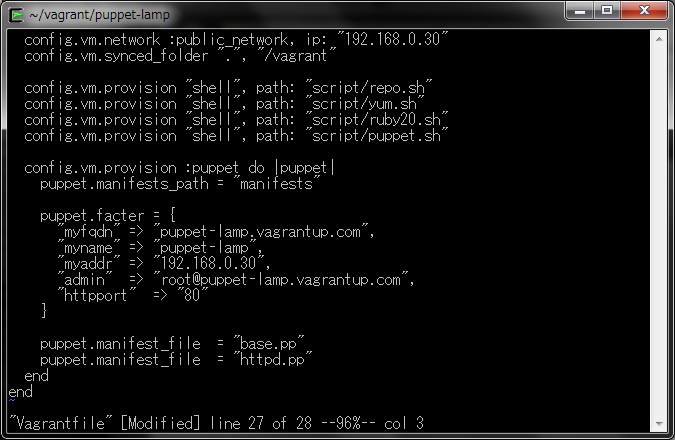
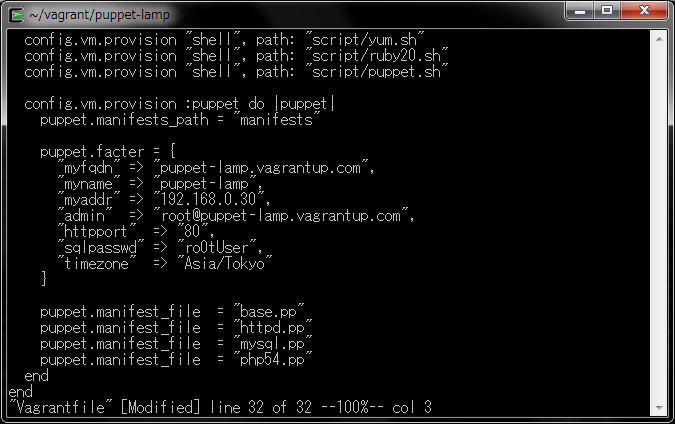
作成したマニフェストをVagrantfileに追加し、マニフェスト内で使用する変数を追加します。
$ vi Vagrantfile
"admin"  => "root@puppet-lamp.vagrantup.com"
"httpport"  => "80"

puppet.manifest_file  = "httpd.pp"
- マニフェストの実行
マニフェストを実行します。
$ vagrant provision
$ vagrant provision
DL is deprecated, please use Fiddle
[default] Running provisioner: shell...
[default] Running: D:/TEMP/vagrant-shell20140123-4536-k335l6
[default] Running provisioner: shell...
[default] Running: D:/TEMP/vagrant-shell20140123-4536-1uugksv
[default] Running provisioner: shell...
[default] Running: D:/TEMP/vagrant-shell20140123-4536-q3x401
[default] Running provisioner: shell...
[default] Running: D:/TEMP/vagrant-shell20140123-4536-ueuo94
[default] Running provisioner: puppet...
Running Puppet with httpd.pp...
Notice: Compiled catalog for puppet-lamp.vagrantup.com in environment production in 1.24 seconds
Notice: /Stage[main]/Main/Service[httpd]/ensure: ensure changed 'stopped' to 'running'
Notice: Finished catalog run in 0.83 seconds
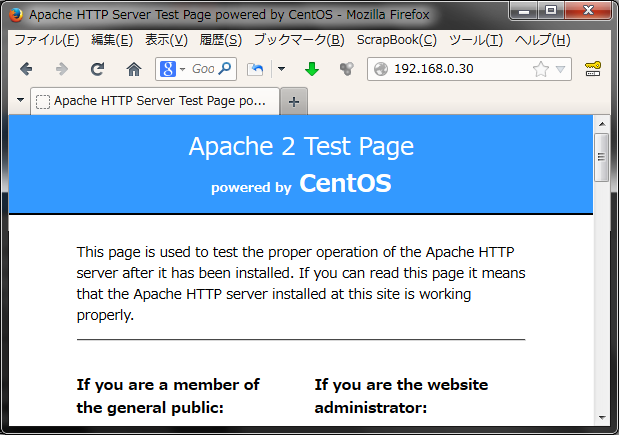
- 動作確認
ブラウザでアクセスすると、デフォルトページが表示されます。
MySQL環境の構築
MySQLをインストールするマニフェストを作成し、MySQL環境を構築します。
- マニフェストの作成
Apacheのインストール設定マニフェストを作成します。
$ vi manifests/mysql.pp
# パッケージインストール
exec { "mysqld":
command => "/usr/bin/yum -y install mysql-server --enablerepo=remi"
}

# my.cnf設定
file { "/etc/my.cnf":
ensure => present,
content => "
[mysqld]
datadir=/var/lib/mysql
socket=/var/lib/mysql/mysql.sock

# Disabling symbolic-links is recommended to prevent assorted security risks
symbolic-links=0

# Settings user and group are ignored when systemd is used (fedora >= 15).
# If you need to run mysqld under a different user or group,
# customize your systemd unit file for mysqld according to the
# instructions in http://fedoraproject.org/wiki/Systemd
user=mysql

# Semisynchronous Replication
# http://dev.mysql.com/doc/refman/5.5/en/replication-semisync.html
# uncomment next line on MASTER
;plugin-load=rpl_semi_sync_master=semisync_master.so
# uncomment next line on SLAVE
;plugin-load=rpl_semi_sync_slave=semisync_slave.so

# Others options for Semisynchronous Replication
;rpl_semi_sync_master_enabled=1
;rpl_semi_sync_master_timeout=10
;rpl_semi_sync_slave_enabled=1

# http://dev.mysql.com/doc/refman/5.5/en/performance-schema.html
;performance_schema

character-set-server=utf8

[mysql]
default-character-set=utf8

[mysqld_safe]
log-error=/var/log/mysqld.log
pid-file=/var/run/mysqld/mysqld.pid
"
}

# サービス起動と自動起動設定
service { "mysqld":
  provider => "redhat",
  enable => true,
  ensure => running
}

# セキュリティ設定
file { "/tmp/mysql_secure":
ensure => present,
content => "
mysql -u root -e \"DELETE FROM mysql.user WHERE User='';\"
mysql -u root -e \"DELETE FROM mysql.user WHERE User='root' AND Host NOT IN ('localhost', '127.0.0.1', '::1');\"
mysql -u root -e \"DROP DATABASE test;\"
mysql -u root -e \"UPDATE mysql.user SET Password=PASSWORD('$sqlpasswd') WHERE User='root';\"
mysql -u root -p$sqlpasswd -e \"FLUSH PRIVILEGES;\"
"
}

exec { "mysql secure":
command => "/bin/sh /tmp/mysql_secure"
}

# サービス再起動
exec { "mysqld-restart":
command => "service mysqld restart",
path => "/bin:/sbin:/usr/bin:/usr/sbin"
}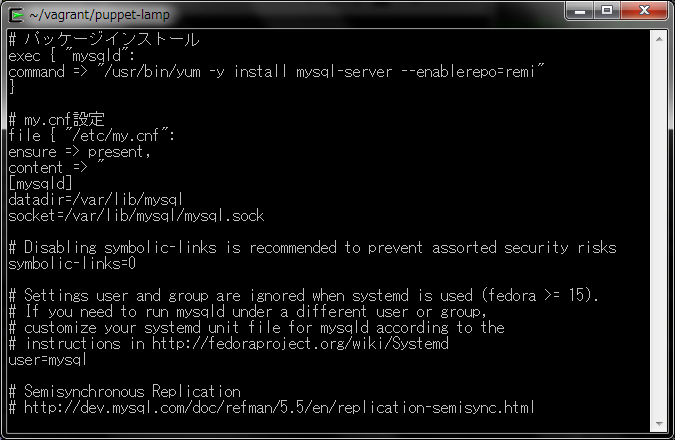
- マニフェストの指定
作成したマニフェストをVagrantfileに追加し、マニフェスト内で使用する変数を追加します。
$ vi Vagrantfile
"sqlpasswd" => "ro0tUser"
puppet.manifest_file  = "mysql.pp"

- マニフェストの実行
マニフェストを実行します。
$ vagrant provision
$ vagrant provision DL is deprecated, please use Fiddle [default] Running provisioner: shell... [default] Running: D:/TEMP/vagrant-shell20140123-5700-gmlkro [default] Running provisioner: shell... [default] Running: D:/TEMP/vagrant-shell20140123-5700-1f0nj5x [default] Running provisioner: shell... [default] Running: D:/TEMP/vagrant-shell20140123-5700-p1iaqy [default] Running provisioner: shell... [default] Running: D:/TEMP/vagrant-shell20140123-5700-1b2dm7i [default] Running provisioner: puppet... Running Puppet with mysql.pp... Notice: Compiled catalog for puppet-lamp.vagrantup.com in environment production in 0.46 seconds Notice: /Stage[main]/Main/Exec[mysqld]/returns: executed successfully Notice: /Stage[main]/Main/File[/tmp/mysql_secure]/content: content changed '{md5}ec22291d96467d96a64720aca5244e15' to '{md5}4880c0ffdbdfefeadb3d5860c3933300' Notice: /Stage[main]/Main/Exec[mysqld-restart]/returns: executed successfully Notice: /Stage[main]/Main/Exec[mysql secure]/returns: executed successfully Notice: Finished catalog run in 6.82 seconds - 動作確認
MySQLがインストールされているか確認します。
mysqlコマンド実行時のパスワードには、Vagrantfileで指定したパスワードを入力します。$ vagrant ssh $ mysql -u root -p -e 'status'
$ vagrant ssh
Last login: Thu Jan 23 17:34:35 2014 from 10.0.2.2
[vagrant@puppet-lamp ~]$ mysql -u root -p -e 'status'
Enter password:
--------------
mysql  Ver 14.14 Distrib 5.5.35, for Linux (i686) using readline 5.1

Connection id:          8
Current database:
Current user:           root@localhost
SSL:                    Not in use
Current pager:          stdout
Using outfile:          ''
Using delimiter:        ;
Server version:         5.5.35 MySQL Community Server (GPL) by Remi
Protocol version:       10
Connection:             Localhost via UNIX socket
Server characterset:    utf8
Db     characterset:    utf8
Client characterset:    utf8
Conn.  characterset:    utf8
UNIX socket:            /var/lib/mysql/mysql.sock
Uptime:                 1 min 59 sec

Threads: 1  Questions: 9  Slow queries: 0  Opens: 33  Flush tables: 1  Open tables: 26  Queries per second avg: 0.075
--------------

[vagrant@puppet-lamp ~]$
PHP環境の構築
PHPをインストールするマニフェストを作成し、PHP環境を構築します。
- マニフェストの作成
PHPのインストール設定マニフェストを作成します。
$ vi manifests/php54.pp
# パッケージインストール
exec { "php54":
command => "/usr/bin/yum -y install php --enablerepo=remi"
}
exec { "php54-devel":
command => "/usr/bin/yum -y install php-mysql php-gd php-pdo php-pear php-mbstring php-devel --enablerepo=remi"
}
exec { "php54-mcrypt":
command => "/usr/bin/yum -y install php-mcrypt --enablerepo=epel,remi,rpmforge"
}

# php.ini設定
exec { "php.ini":
command => "/bin/sed -i -e 's|^;date.timezone.*$|date.timezone = $timezone|' /etc/php.ini"
}
file { "/var/www/html/phpinfo.php":
ensure => present,
content => '
<!DOCTYPE HTML PUBLIC "-//W3C//DTD HTML 4.01 Transitional//EN">
<html>
<head>
<meta http-equiv="Content-Type" content="text/html; charset=UTF-8">
phpinfo</title>
</head>
<body>
<?php
phpinfo();
?>
</body>
</html>
'
}

exec { "httpd":
command => "/sbin/service httpd restart",
subscribe   => File["/var/www/html/phpinfo.php"],
refreshonly => true
}

exec { "httpd":
command => "/sbin/service httpd restart",
subscribe   => File["/var/www/html/phpinfo.php"],
refreshonly => true
}
- マニフェストの指定
作成したマニフェストをVagrantfileに追加し、マニフェスト内で使用する変数を追加します。
$ vi Vagrantfile
"timezone"  => "Asia/Tokyo"
puppet.manifest_file  = "php54.pp"
- マニフェストの実行
マニフェストを実行します。
$ vagrant provision
$ vagrant provision
DL is deprecated, please use Fiddle
[default] Running provisioner: shell...
[default] Running: D:/TEMP/vagrant-shell20140123-5168-11u8ry1
[default] Running provisioner: shell...
[default] Running: D:/TEMP/vagrant-shell20140123-5168-1blkzj0
[default] Running provisioner: shell...
[default] Running: D:/TEMP/vagrant-shell20140123-5168-n4sdbk
[default] Running provisioner: shell...
[default] Running: D:/TEMP/vagrant-shell20140123-5168-1a2pag5
[default] Running provisioner: puppet...
Running Puppet with php54.pp...
Notice: Compiled catalog for puppet-lamp.vagrantup.com in environment production in 0.25 seconds
Notice: /Stage[main]/Main/Exec[php54]/returns: executed successfully
Notice: /Stage[main]/Main/Exec[php54-devel]/returns: executed successfully
Notice: /Stage[main]/Main/File[/var/www/html/phpinfo.php]/ensure: created
Notice: /Stage[main]/Main/Exec/returns: executed successfully
Notice: /Stage[main]/Main/Exec[httpd]: Triggered 'refresh' from 1 events
Notice: /Stage[main]/Main/Exec[php54-mcrypt]/returns: executed successfully
Notice: Finished catalog run in 104.70 seconds
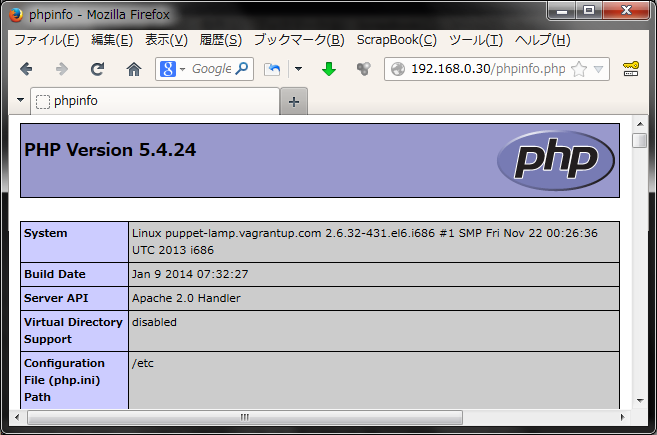
- 動作確認
ブラウザでアクセスすると、PHPの構成情報が表示されます。
まとめ
ここまで、LAMP環境を構築するマニフェストを作成し、プロビジョニングを行う方法を解説しました。Puppetを用いたプロビジョニングでは、マニフェストを記述することで、サーバーの構成管理を行います。今回作成したVagrantfileとsマニフェストを参考にして、Puppetプロビジョニングにチャレンジしてみましょう。