
はじめに
これまで本ブログでは、Chefを用いたBoxのプロビジョニング方法について数多く取り上げて来ましたが、Vagrantのプロビジョニング機能については、取り上げていません。そこで今回は、Vagrantのプロビジョニング機能を用いてカスタムBoxを作成し、作成したカスタムBoxのパッケージ化の方法とBoxの配布方法について解説します。
カスタムBoxを作成するためには、ベースとなるBoxが必要になります。ここでは、本プログで作成したCentOS-6.4-x86_64-minimal.boxをBase Boxとして利用して、カスタマイズを行います。
作成に使用するマシン環境は、下記のとおりです。
| ソフトウエア | バージョン |
|---|---|
| OS | Windows 7 Ultimate 32bit |
| Cygwin | Setup Version 2.831 |
| Vagrant | 1.2.7 |
Base Boxの起動
カスタムBoxのベースとなるBoxを起動します。
これまではBoxの起動方法として、add,init,upの順にコマンドを実行していましたが、今回は、これまでとは異なる方法でBoxを起動します。
-
初期化
Box名を指定して、初期化します。
$ mkdir -p ~/mybox/vagrant/CentOS-6.4-x86_64-custom && cd ~/mybox/vagrant/CentOS-6.4-x86_64-custom
$ vagrant init CentOS-6.4-x86_64-custom
punio@PAPA ~
$ mkdir -p ~/mybox/vagrant/CentOS-6.4-x86_64-custom && cd ~/mybox/vagrant/CentOS-6.4-x86_64-custom

punio@PAPA ~/mybox/vagrant/CentOS-6.4-x86_64-custom
$ vagrant init CentOS-6.4-x86_64-custom
A `Vagrantfile` has been placed in this directory. You are now
ready to `vagrant up` your first virtual environment! Please read
the comments in the Vagrantfile as well as documentation on
`vagrantup.com` for more information on using Vagrant.

punio@PAPA ~/mybox/vagrant/CentOS-6.4-x86_64-custom
-
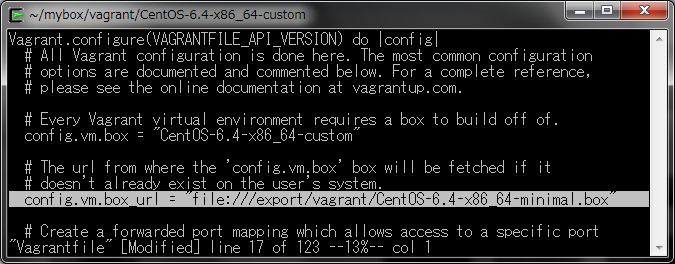
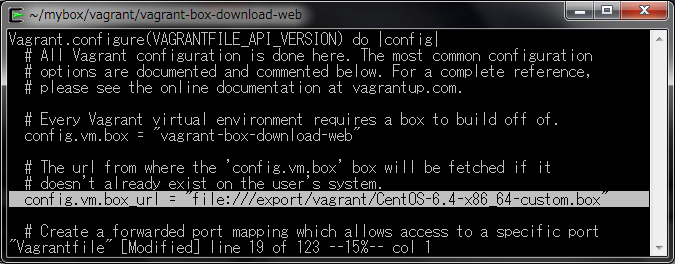
Vagrantfileの修正
作成されたVagrantfileを、下記のとおり修正します。
box_urlを指定することで、どこから取得したBoxなのかが分かりますので、今後はこの方法でBoxを起動します。config.vm.box_url = "file:///export/vagrant/CentOS-6.4-x86_64-minimal.box"
-
Boxの起動
Vagrantfileを修正したら、Boxを起動します。
$ vagrant up
box_urlに指定したBoxが自動的に取得されて、Boxが起動します。
punio@PAPA ~/mybox/vagrant/CentOS-6.4-x86_64-custom
$ vagrant up
Bringing machine 'default' up with 'virtualbox' provider...
[default] Box 'CentOS-6.4-x86_64-custom' was not found. Fetching box from specified URL for
the provider 'virtualbox'. Note that if the URL does not have
a box for this provider, you should interrupt Vagrant now and add
the box yourself. Otherwise Vagrant will attempt to download the
full box prior to discovering this error.
Downloading or copying the box...
Extracting box...ate: 115M/s, Estimated time remaining: --:--:--)
Successfully added box 'CentOS-6.4-x86_64-custom' with provider 'virtualbox'!
[default] Importing base box 'CentOS-6.4-x86_64-custom'...
[default] Matching MAC address for NAT networking...
[default] Setting the name of the VM...
[default] Clearing any previously set forwarded ports...
[default] Creating shared folders metadata...
[default] Clearing any previously set network interfaces...
[default] Preparing network interfaces based on configuration...
[default] Forwarding ports...
[default] -- 22 => 2222 (adapter 1)
[default] Booting VM...
[default] Waiting for VM to boot. This can take a few minutes.
[default] VM booted and ready for use!
[default] Mounting shared folders...
[default] -- /vagrant
-
Boxの停止
起動に成功したら、Boxをシャットダウンします。
$ vagrant halt
これまでは、sshで接続してshutdownコマンドを実行していましたが、haltコマンドを実行することでも安全にシャットダウンできます。
punio@PAPA ~/mybox/vagrant/CentOS-6.4-x86_64-custom
$ vagrant halt
[default] Attempting graceful shutdown of VM...

punio@PAPA ~/mybox/vagrant/CentOS-6.4-x86_64-custom
Base Boxのプロビジョニング
Base Boxの起動確認ができましたので、Vagrantのshell provisionを使用してBoxをカスタマイズします。
shell provisionerは、2種類ありますので順を追って解説します。
-
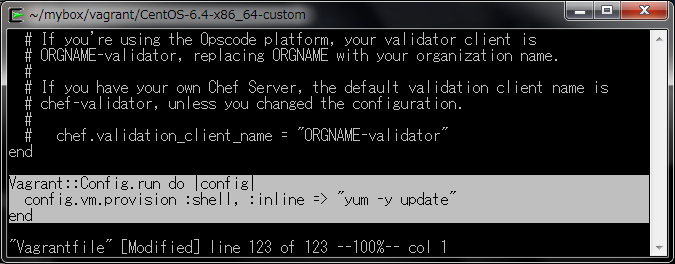
inline shell provision
Vagrantfile中に実行する処理を記述するプロビジョニング方法です。
今回は、yum updateコマンドでシステム更新を実行します。
Vagrant::Config.run do |config|
  config.vm.provision :shell, :inline => "yum -y update"
end
このように、inlineでは単一コマンドしか実行できませんので、より複雑な処理を行いたい場合は、shell provisionを利用します。
Vagrantfileを修正したら、Boxを起動します。
$ vagrant up
$ vagrant halt
Boxを起動すると、”Running: inline script”が表示されコマンドが実行されたことが確認できます。
punio@PAPA ~/mybox/vagrant/CentOS-6.4-x86_64-custom
$ vagrant up
Bringing machine 'default' up with 'virtualbox' provider...
[default] Setting the name of the VM...
[default] Clearing any previously set forwarded ports...
[default] Creating shared folders metadata...
[default] Clearing any previously set network interfaces...
[default] Preparing network interfaces based on configuration...
[default] Forwarding ports...
[default] -- 22 => 2222 (adapter 1)
[default] Booting VM...
[default] Waiting for VM to boot. This can take a few minutes.
[default] VM booted and ready for use!
[default] Mounting shared folders...
[default] -- /vagrant
[default] Running provisioner: shell...
[default] Running: inline script
Loaded plugins: fastestmirror
Loading mirror speeds from cached hostfile
 * base: mirror.nus.edu.sg
 * extras: mirrors.btte.net
 * updates: mirrors.neusoft.edu.cn
Setting up Update Process
No Packages marked for Update

punio@PAPA ~/mybox/vagrant/CentOS-6.4-x86_64-custom
-
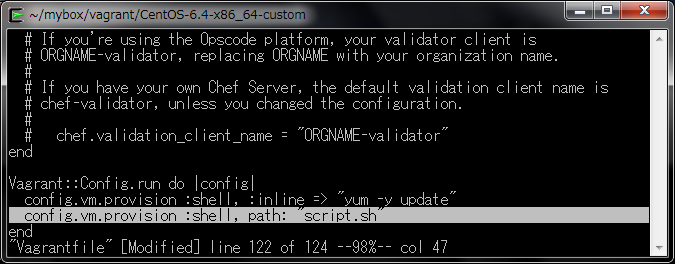
shell provision
Vagrantfile中に実行するshell script名を記述するプロビジョニング方法です。
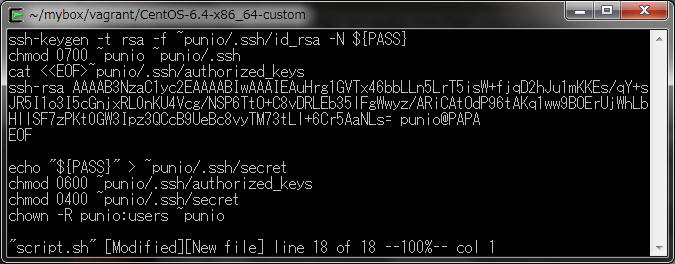
今回は、ユーザーアカウントを作成し、SSH公開鍵を登録するscriptを作成しています。
Vagrant::Config.run do |config|
  config.vm.provision :shell, :inline => "yum -y update"
  config.vm.provision :shell, path: "script.sh"
end
Vagrantfileを修正したら、Boxを起動します。
$ vagrant up
$ vagrant halt
Boxを起動すると、”Running: D:/TEMP/vagrant-shell..”が表示され、コマンドが実行されたことが確認できます。
Vagrantでは、指定されたshell scriptを/tmpフォルダにユニークな名前でコピーして実行しますので、Vagrantfileで指定したscript名と異なる表示になります。
また、symbolic linkの先のshell scriptは、vagrant up時に読み取りエラーになってしまいますので、実ファイルとして、カレントフォルダに保存します。punio@PAPA ~/mybox/vagrant/CentOS-6.4-x86_64-custom $ vagrant up Bringing machine 'default' up with 'virtualbox' provider... [default] Setting the name of the VM... [default] Clearing any previously set forwarded ports... [default] Creating shared folders metadata... [default] Clearing any previously set network interfaces... [default] Preparing network interfaces based on configuration... [default] Forwarding ports... [default] -- 22 => 2222 (adapter 1) [default] Booting VM... [default] Waiting for VM to boot. This can take a few minutes. [default] VM booted and ready for use! [default] Mounting shared folders... [default] -- /vagrant [default] Running provisioner: shell... [default] Running: inline script Loaded plugins: fastestmirror Loading mirror speeds from cached hostfile * base: mirror.nus.edu.sg * extras: mirrors.btte.net * updates: mirrors.neusoft.edu.cn Setting up Update Process No Packages marked for Update [default] Running provisioner: shell... [default] Running: D:/TEMP/vagrant-shell20131126-1452-2yygem Generating public/private rsa key pair.
-
共有フォルダを使用したプロビジョニング
Vagrantでは、BoxにVirtualBox Guest Additionがインストールされている時に限り、Boxを起動したカレントフォルダを共有フォルダとして/vagrantにデフォルトでマウントしています。
この機能を使って、実行したい処理をshell scriptで記述しておき、Boxを起動した後にBox上の/vagrant配下のshell scriptを手動で実行することもできます。
Vagrantのshell provision以外で、手っ取り早くshellで処理を実行したい場合などに使えると思います。
Boxのパッケージ化
カスタマイズしたBoxをパッケージ化します。このパッケージ化によりカスタマイズされたBoxが作成できますので、ウエブ上で公開して再利用することが可能になります。
packageコマンドでは、パッケージの元となるBoxの指定方法が2種類あります。また、出力するBox名を指定することで任意のフォルダにBoxを保存できます。
-
UUID指定
UUIDは、vagrant addを実行することで、.vagrant/machines/default/virtualboxフォルダにidファイルとして記録されてますので、このidファイルを利用します。
$ cd ~/mybox/vagrant/CentOS-6.4-x86_64-custom
$ rm -f /export/vagrant/CentOS-6.4-x86_64-custom.box
$ vagrant package --base `cat .vagrant/machines/default/virtualbox/id` --output /export/vagrant/CentOS-6.4-x86_64-custom.box
punio@PAPA ~/mybox/vagrant/CentOS-6.4-x86_64-custom
$ rm -f /export/vagrant/CentOS-6.4-x86_64-custom.box

punio@PAPA ~/mybox/vagrant/CentOS-6.4-x86_64-custom
$ vagrant package --base `cat .vagrant/machines/default/virtualbox/id` --output /export/vagrant/CentOS-6.4-x86_64-custom.box
[5731e3e0-8b53-4306-bd24-b813413c6bff] Clearing any previously set forwarded ports...
[5731e3e0-8b53-4306-bd24-b813413c6bff] Creating temporary directory for export...
[5731e3e0-8b53-4306-bd24-b813413c6bff] Exporting VM...
[5731e3e0-8b53-4306-bd24-b813413c6bff] Compressing package to: D:/export/vagrant/CentOS-6.4-x86_64-custom.box
-
仮想マシン名指定
UUIDでは無く、仮想マシン名を指定することもできます。
$ VBoxManage list vms | grep `cat .vagrant/machines/default/virtualbox/id`
$ rm -f /export/vagrant/CentOS-6.4-x86_64-custom.box
$ vagrant package --base CentOS-64-x86_64-custom_default_1385464131 --output /export/vagrant/CentOS-6.4-x86_64-custom.box
この方法では、VBoxManage list vmsコマンドを実行して、UUIDに対応する仮想マシン名を確認してパッケージ化を行っています。Vagrantが生成する仮想マシン名は、読みにくいものが多いため、UUIDを指定したパッケージ化をお勧めします。
punio@PAPA ~/mybox/vagrant/CentOS-6.4-x86_64-custom
$ VBoxManage list vms | grep `cat .vagrant/machines/default/virtualbox/id`
"CentOS-64-x86_64-custom_default_1385464131" {5731e3e0-8b53-4306-bd24-b813413c6bff}

punio@PAPA ~/mybox/vagrant/CentOS-6.4-x86_64-custom
$ rm -f /export/vagrant/CentOS-6.4-x86_64-custom.box

punio@PAPA ~/mybox/vagrant/CentOS-6.4-x86_64-custom
$ vagrant package --base CentOS-64-x86_64-custom_default_1385464131 --output /export/vagrant/CentOS-6.4-x86_64-custom.box
[CentOS-64-x86_64-custom_default_1385464131] Clearing any previously set forwarded ports...
[CentOS-64-x86_64-custom_default_1385464131] Creating temporary directory for export...
[CentOS-64-x86_64-custom_default_1385464131] Exporting VM...
[CentOS-64-x86_64-custom_default_1385464131] Compressing package to: D:/export/vagrant/CentOS-6.4-x86_64-custom.box
Boxの配布
カスタムBoxをパッケージ化できましたので、Box配布用のウエブサーバーを作成します。
-
初期化
$ mkdir -p ~/mybox/vagrant/vagrant-box-download-web && cd ~/mybox/vagrant/vagrant-box-download-web
$ vagrant init vagrant-box-download-web
punio@PAPA ~/mybox/vagrant/CentOS-6.4-x86_64-custom
$ mkdir -p ~/mybox/vagrant/vagrant-box-download-web && cd ~/mybox/vagrant/vagrant-box-download-web

punio@PAPA ~/mybox/vagrant/vagrant-box-download-web
$ vagrant init vagrant-box-download-web
A `Vagrantfile` has been placed in this directory. You are now
ready to `vagrant up` your first virtual environment! Please read
the comments in the Vagrantfile as well as documentation on
`vagrantup.com` for more information on using Vagrant.

punio@PAPA ~/mybox/vagrant/vagrant-box-download-web
$ vi Vagrantfile
-
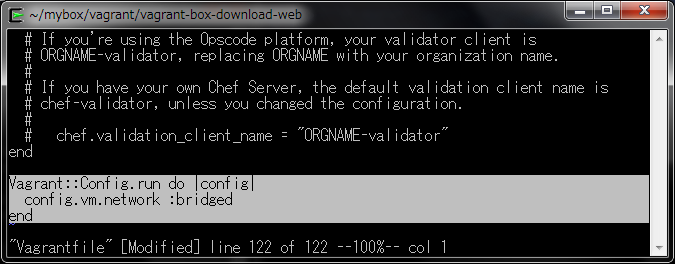
Vagrantfileの修正
Base Boxとして先に作成したBoxを指定し、ブリッジネットワークをVagrantfileに追加します。
config.vm.box_url = "file:///export/vagrant/CentOS-6.4-x86_64-custom.box"
Vagrant::Config.run do |config|
  config.vm.network :bridged
end
-
Boxの起動
Boxを起動し、接続します。
$ vagrant up
$ vagrant ssh
punio@PAPA ~/mybox/vagrant/vagrant-box-download-web
$ vagrant up
Bringing machine 'default' up with 'virtualbox' provider...
[default] Box 'vagrant-box-download-web' was not found. Fetching box from specified URL for
the provider 'virtualbox'. Note that if the URL does not have
a box for this provider, you should interrupt Vagrant now and add
the box yourself. Otherwise Vagrant will attempt to download the
full box prior to discovering this error.
Downloading or copying the box...
Extracting box...ate: 148M/s, Estimated time remaining: --:--:--)
Successfully added box 'vagrant-box-download-web' with provider 'virtualbox'!
[default] Importing base box 'vagrant-box-download-web'...
[default] Matching MAC address for NAT networking...
[default] Setting the name of the VM...
[default] Clearing any previously set forwarded ports...
[default] Creating shared folders metadata...
[default] Clearing any previously set network interfaces...
[default] Preparing network interfaces based on configuration...
[default] Forwarding ports...
[default] -- 22 => 2222 (adapter 1)
[default] Booting VM...
[default] Waiting for VM to boot. This can take a few minutes.
[default] VM booted and ready for use!
[default] Configuring and enabling network interfaces...
[default] Mounting shared folders...
[default] -- /vagrant

punio@PAPA ~/mybox/vagrant/vagrant-box-download-web
-
Apacheのインストール
$ sudo yum -y install httpd
$ sudo shutdown -h now
punio@PAPA ~/mybox/vagrant/vagrant-box-download-web
$ vagrant ssh
Last login: Tue Nov 26 19:31:30 2013 from 10.0.2.2
[vagrant@centos64-x86_64 ~]$ sudo yum -y install httpd
Loaded plugins: fastestmirror
Loading mirror speeds from cached hostfile
 * base: mirror.nus.edu.sg
 * extras: mirrors.btte.net
 * updates: mirrors.neusoft.edu.cn
Setting up Install Process
Resolving Dependencies
--> Running transaction check
---> Package httpd.x86_64 0:2.2.15-29.el6.centos will be installed
--> Processing Dependency: httpd-tools = 2.2.15-29.el6.centos for package: httpd-2.2.15-29.el6.centos.x86_64
--> Processing Dependency: apr-util-ldap for package: httpd-2.2.15-29.el6.centos.x86_64
--> Processing Dependency: /etc/mime.types for package: httpd-2.2.15-29.el6.centos.x86_64
--> Processing Dependency: libaprutil-1.so.0()(64bit) for package: httpd-2.2.15-29.el6.centos.x86_64
--> Processing Dependency: libapr-1.so.0()(64bit) for package: httpd-2.2.15-29.el6.centos.x86_64
--> Running transaction check
---> Package apr.x86_64 0:1.3.9-5.el6_2 will be installed
---> Package apr-util.x86_64 0:1.3.9-3.el6_0.1 will be installed
---> Package apr-util-ldap.x86_64 0:1.3.9-3.el6_0.1 will be installed
---> Package httpd-tools.x86_64 0:2.2.15-29.el6.centos will be installed
---> Package mailcap.noarch 0:2.1.31-2.el6 will be installed
--> Finished Dependency Resolution
-
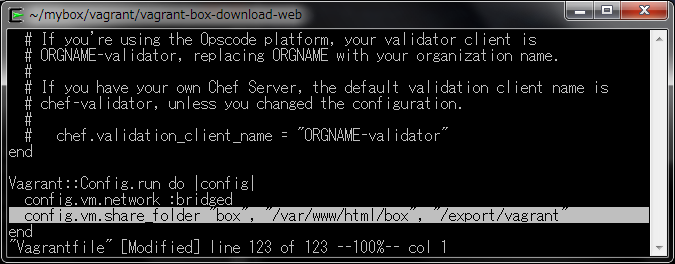
共有フォルダの追加
Vagrantfileに共有フォルダの設定を追加します。
共有元のフォルダには、Vagrant Box保存フォルダの”/export/vagrant”を指定しています。
また、マウント先には、ApacheのDocumentRoot配下の”/var/www/html/box”を指定しています。Vagrant::Config.run do |config| config.vm.network :bridged config.vm.share_folder "box", "/var/www/html/box", "/export/vagrant" end
-
Boxの起動
Boxを起動し、接続します。
$ vagrant up
$ vagrant ssh
-
Apacheの設定変更
/etc/httpd/conf/httpd.confを下記のとおり修正します。
AddType text/x-component .box
EnableMMAP off
-
Attpd.confの構文チェック
httpd.confの構文エラーをチェックします。
httpd -t
-
Apacheの自動起動設定
Apacheの自動起動設定を行います。
$ sudo chkconfig --add httpd
$ sudo chkconfig httpd on
$ sudo service httpd start
以上で、Box公開用ウエブサイトの構築は終了です。
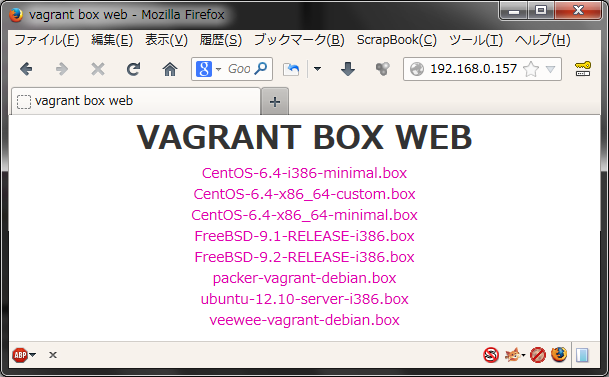
ウエブ上のBoxの起動
最後に、作成した公開ウエブからBoxをダウンロードして、起動できるかを確認します。手順としては、通常のBox起動と同じです。
-
初期化
$ mkdir -p ~/mybox/vagrant/vagrant-box-from-web && cd ~/mybox/vagrant/vagrant-box-from-web
$ vagrant init vagrant-box-from-web
punio@PAPA ~/mybox/vagrant/vagrant-box-download-web
$ mkdir -p ~/mybox/vagrant/vagrant-box-from-web && cd ~/mybox/vagrant/vagrant-box-from-web

punio@PAPA ~/mybox/vagrant/vagrant-box-from-web
$ vagrant init vagrant-box-from-web
A `Vagrantfile` has been placed in this directory. You are now
ready to `vagrant up` your first virtual environment! Please read
the comments in the Vagrantfile as well as documentation on
`vagrantup.com` for more information on using Vagrant.

punio@PAPA ~/mybox/vagrant/vagrant-box-from-web
$ vi Vagrantfile
-
Vagrantfileの修正
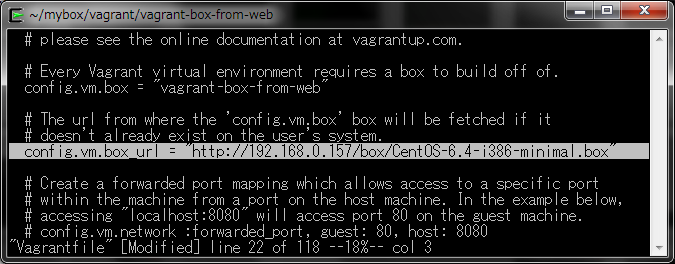
作成されたVagrantfileを、下記のとおり修正します。
IPアドレスは、Box公開ウエブのIPアドレスを確認して指定して下さい。config.vm.box_url = "http://192.168.0.157/box/CentOS-6.4-i386-minimal.box"
-
Boxの起動
Vagrantfileを修正したら、Boxを起動します。
$ vagrant up
box_urlに指定したBoxが自動的に取得されて、Boxが起動します。
punio@PAPA ~/mybox/vagrant/vagrant-box-from-web
$ vagrant up
Bringing machine 'default' up with 'virtualbox' provider...
[default] Box 'vagrant-box-from-web' was not found. Fetching box from specified URL for
the provider 'virtualbox'. Note that if the URL does not have
a box for this provider, you should interrupt Vagrant now and add
the box yourself. Otherwise Vagrant will attempt to download the
full box prior to discovering this error.
Downloading or copying the box...
Extracting box...ate: 9.9M/s, Estimated time remaining: --:--:--)
Successfully added box 'vagrant-box-from-web' with provider 'virtualbox'!
[default] Importing base box 'vagrant-box-from-web'...
[default] Matching MAC address for NAT networking...
[default] Setting the name of the VM...
[default] Clearing any previously set forwarded ports...
[default] Fixed port collision for 22 => 2222. Now on port 2200.
[default] Creating shared folders metadata...
[default] Clearing any previously set network interfaces...
[default] Preparing network interfaces based on configuration...
[default] Forwarding ports...
[default] -- 22 => 2200 (adapter 1)
[default] Booting VM...
[default] Waiting for VM to boot. This can take a few minutes.
[default] VM booted and ready for use!
[default] Mounting shared folders...
[default] -- /vagrant
punio@PAPA ~/mybox/vagrant/vagrant-box-from-web
-
Boxの停止
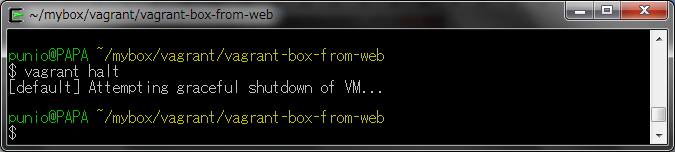
起動に成功したら、Boxをシャットダウンします。
$ vagrant halt
まとめ
ここまで、Vagrantを使ったシェルプロビジョニングと、パッケージ作成方法について解説しました。共有フォルダを使用することで、ローカルマシン上のBoxを公開する方法も解説しましたので、既存のBoxを公開することもできます。Vagrantによるプロビジョニングは、Chefのように高機能なプロビジョニングは行えませんが、直ぐにカスタムBoxが欲しい場合などでは、使いなれたshellを使って自由にカスタマイズできるメリットがあります。この記事を参考にして、カスタムBoxを作ってみましょう。