はじめに
第1回の記事では、Cygwinおよび、rbenv環境を構築しました。第2回の記事では、仮想化ソフトウエアを導入し、Chef環境を構築しました。
最終回となる第3回は、前回構築した環境を用いて仮想マシンを作成し、プロビジョニングを実行します。
プロビジョニングを実行するマシン環境は、下記のとおりです。
| ソフトウエア | バージョン |
|---|---|
| OS | Windows 7 Ultimate 32bit |
| ホスト名 | PAPA |
| IPアドレス | 192.168.0.253 |
| Cygwin | Setup Version 2.831 |
| rbenv | ruby 2.1.0dev (2013-09-22 trunk 43011) [i386-cygwin] |
| RubyGems | 2.2.0.preview.1 |
| Bundler | version 1.3.5 |
| VirtualBox | 4.2.18 r88780 |
| Veewee | 0.3.12 |
| Packer | v0.3.11 |
| Vagrant | 1.2.7 |
| chef | 11.8.0 |
| knife-solo | 11.8.0 |
| berkshelf | 2.0.10 |
Veewee + Vagrant Boxの作成
プロビジョニングの対象となる仮想マシン(Box)を、Veeweeで作成しVagrantで起動できるようにします。
以下の手順でVeewee + Vagrant Boxを作成します。なお、作成するBoxは、Debian-7.2.0-i386とします。
-
テンプレートの取得
Veeweeでは、作成可能なBoxのテンプレートを使用してBoxを作成するため、テンプレートを取得します。
$ mkdir -p ~/mybox/veewee && cd ~/mybox/veewee
$ veewee vbox templates
punio@PAPA ~
$ mkdir -p ~/mybox/veewee && cd ~/mybox/veewee

punio@PAPA ~/mybox/veewee
$ veewee vbox templates
The following templates are available:
veewee vbox define '' 'CentOS-4.8-i386' --workdir=/home/punio/mybox/veewee
veewee vbox define '' 'CentOS-5.5-i386-netboot' --workdir=/home/punio/mybox/veewee
veewee vbox define '' 'CentOS-5.5-x86_64-netboot' --workdir=/home/punio/mybox/veewee
veewee vbox define '' 'CentOS-5.6-i386' --workdir=/home/punio/mybox/veewee
veewee vbox define '' 'CentOS-5.6-i386-netboot' --workdir=/home/punio/mybox/veewee
veewee vbox define '' 'CentOS-5.6-x86_64-netboot' --workdir=/home/punio/mybox/veewee
veewee vbox define '' 'CentOS-5.6-x86_64-netboot-packages' --workdir=/home/punio/mybox/veewee
veewee vbox define '' 'CentOS-5.7-i386-netboot' --workdir=/home/punio/mybox/veewee
veewee vbox define '' 'CentOS-5.7-x86_64-netboot' --workdir=/home/punio/mybox/veewee
veewee vbox define '' 'CentOS-5.8-i386' --workdir=/home/punio/mybox/veewee
veewee vbox define '' 'Debian-6.0.6-i386-netboot' --workdir=/home/punio/mybox/veewee
veewee vbox define '' 'Debian-6.0.7-amd64-netboot' --workdir=/home/punio/mybox/veewee
veewee vbox define '' 'Debian-6.0.7-i386-netboot' --workdir=/home/punio/mybox/veewee
veewee vbox define '' 'Debian-7.0-amd64-netboot' --workdir=/home/punio/mybox/veewee
veewee vbox define '' 'Debian-7.0-i386-netboot' --workdir=/home/punio/mybox/veewee
veewee vbox define '' 'Debian-7.1.0-amd64-netboot' --workdir=/home/punio/mybox/veewee
veewee vbox define '' 'Debian-7.1.0-i386-netboot' --workdir=/home/punio/mybox/veewee
veewee vbox define '' 'Debian-7.2.0-amd64-netboot' --workdir=/home/punio/mybox/veewee
veewee vbox define '' 'Debian-7.2.0-i386-netboot' --workdir=/home/punio/mybox/veewee
veewee vbox define '' 'Fedora-14-amd64' --workdir=/home/punio/mybox/veewee
veewee vbox define '' 'Fedora-14-amd64-netboot' --workdir=/home/punio/mybox/veewee
veewee vbox define '' 'Fedora-14-i386' --workdir=/home/punio/mybox/veewee
veewee vbox define '' 'Fedora-14-i386-netboot' --workdir=/home/punio/mybox/veewee
veewee vbox define '' 'Fedora-15-i386' --workdir=/home/punio/mybox/veewee
veewee vbox define '' 'Fedora-15-i386-netboot' --workdir=/home/punio/mybox/veewee
-
Boxの定義
取得したテンプレートの一覧から、Debian-7.2.0-i386を指定してBoxを定義します。
$ veewee vbox define 'veewee-vagrant-debian' 'Debian-7.2.0-i386-netboot'
punio@PAPA ~/mybox/veewee
$ veewee vbox define 'veewee-vagrant-debian' 'Debian-7.2.0-i386-netboot'
The basebox 'veewee-vagrant-debian' has been successfully created from the template 'Debian-7.2.0-i386-netboot'
You can now edit the definition files stored in /home/punio/mybox/veewee/definitions/veewee-vagrant-debian or build the box with:
veewee vbox build 'veewee-vagrant-debian' --workdir=/home/punio/mybox/veewee
実行すると、definitionsフォルダ下に、veewee-vagrant-debianフォルダが作成されますので、definitions.rbおよび、シェルスクリプトを環境に合わせて修正します。
-
Boxの作成
Boxテンプレートの修正が終了したら、以下のコマンドを実行して、Boxを作成します。
$ veewee vbox build 'veewee-vagrant-debian'
punio@PAPA ~/mybox/veewee
$ veewee vbox build 'veewee-vagrant-debian'
Downloading vbox guest additions iso v 4.2.18 - http://download.virtualbox.org/virtualbox/4.2.18/VBoxGuestAdditions_4.2.18.iso
Checking if isofile VBoxGuestAdditions_4.2.18.iso already exists.
Full path: /home/punio/mybox/veewee/iso/VBoxGuestAdditions_4.2.18.iso
Moving /home/punio/mybox/veewee/open-uri20131118-2576-13eca2g to /home/punio/mybox/veewee/iso/VBoxGuestAdditions_4.2.18.iso
Building Box veewee-vagrant-debian with Definition veewee-vagrant-debian:
- debug : false
- cwd : /home/punio/mybox/veewee
- force : false
- nogui : false
- auto : false
- checksum : false
- redirectconsole : false
- postinstall_include : []
- postinstall_exclude : []

We did not find an isofile here : /home/punio/mybox/veewee/iso/debian-7.2.0-i386-netinst.iso.

The definition provided the following download information:
- Download url: http://cdimage.debian.org/debian-cd/7.2.0/i386/iso-cd/debian-7.2.0-i386-netinst.iso
- Md5 Checksum: 564282a81b5aef7015501e497fc63d81


Download? (Yes/No) Yes
The following packages will be REMOVED:
  g++ g++-4.7 libstdc++6-4.7-dev linux-headers-3.2.0-4-common linux-kbuild-3.2
0 upgraded, 0 newly installed, 5 to remove and 2 not upgraded.
After this operation, 45.0 MB disk space will be freed.
(Reading database ... 31318 files and directories currently installed.)
Removing g++ ...
Removing linux-headers-3.2.0-4-common ...
Removing linux-kbuild-3.2 ...
Removing g++-4.7 ...
Removing libstdc++6-4.7-dev ...
Processing triggers for man-db ...
cleaning up dhcp leases
cleaning up udev rules
rm: cannot remove `/etc/udev/rules.d/70-persistent-net.rules': No such file or directory
Adding a 2 sec delay to the interface up, to make the dhclient happy
Waiting for ssh login on 127.0.0.1 with user vagrant to sshd on port => 7222 to work, timeout=10000 sec
.
Executing command: echo 'vagrant'|sudo -S sh './zerodisk.sh'
dd: writing `/EMPTY': No space left on device
6627+0 records in
6626+0 records out
6948593664 bytes (6.9 GB) copied, 46.7342 s, 149 MB/s
The box veewee-vagrant-debian was built successfully!
You can now login to the box with:
ssh -o UserKnownHostsFile=/dev/null -o StrictHostKeyChecking=no -p 7222 -l vagrant 127.0.0.1
Veeweeでは、buildが終了してもBoxは起動されたままの状態になりますので、以下のコマンドを実行してBoxにログインして、shutdownします。
$ ssh -o UserKnownHostsFile=/dev/null -o StrictHostKeyChecking=no -p 7222 -l vagrant 127.0.0.1
$ sudo shutdown -h now
punio@PAPA ~/mybox/veewee
$ ssh -o UserKnownHostsFile=/dev/null -o StrictHostKeyChecking=no -p 7222 -l vagrant 127.0.0.1
Warning: Permanently added '[127.0.0.1]:7222' (ECDSA) to the list of known hosts.
vagrant@127.0.0.1's password:
Linux veewee-vagrant-debian 3.2.0-4-686-pae #1 SMP Debian 3.2.51-1 i686

The programs included with the Debian GNU/Linux system are free software;
the exact distribution terms for each program are described in the
individual files in /usr/share/doc/*/copyright.

Debian GNU/Linux comes with ABSOLUTELY NO WARRANTY, to the extent
permitted by applicable law.
Last login: Mon Nov 18 01:53:17 2013 from 10.0.2.2
vagrant@veewee-vagrant-debian:~$
vagrant@veewee-vagrant-debian:~$ sudo shutdown -h now

The system is going down for system halt NOW!bian (pts/0) (Mon Nov 18 01:59:1
vagrant@veewee-vagrant-debian:~$ Connection to 127.0.0.1 closed by remote host.
Connection to 127.0.0.1 closed.

punio@PAPA ~/mybox/veewee
-
Boxの変換
以下のコマンドを実行して、作成したBoxをVagrant用のBoxに変換し、変換したBoxを/export/vagrantfフォルダに移動します。
punio@PAPA ~/mybox/veewee
$ veewee vbox export veewee-vagrant-debian
Creating a temporary directory for export
Adding additional files
Creating Vagrantfile
Exporting the box
Executing VBoxManage export veewee-vagrant-debian --output /home/punio/mybox/veewee/d20131118-5728-1rhsy90/box.ovf
0%...10%...20%...30%...40%...50%...60%...70%...80%...90%...100%
Successfully exported 1 machine(s).
Packaging the box
Cleaning up temporary directory

To import it into vagrant type:
vagrant box add 'veewee-vagrant-debian' '/home/punio/mybox/veewee/veewee-vagrant-debian.box'

To use it:
vagrant init 'veewee-vagrant-debian'
vagrant up
vagrant ssh


punio@PAPA ~/mybox/veewee
$ mv veewee-vagrant-debian.box /export/vagrant


punio@PAPA ~/mybox/veewee
$ ls /export/vagrant/
veewee-vagrant-debian.box
$ veewee vbox export veewee-vagrant-debian
$ mv veewee-vagrant-debian.box /export/vagrant
Packer + Vagrant Boxの作成
プロビジョニングの対象となる仮想マシン(Box)を、Packerで作成しVagrantで起動できるようにします。
以下の手順でPacker + Vagrant Boxを作成します。なお、作成するBoxは、Debian-7.2.0-i386とします。
-
JSONファイルの作成
開発者必見!仮想環境の構築を自動化する方法とはを参考にして、Packerのビルド定義ファイルを作成します。ここでは、config.jsonとして作成しています。また、実行するシェルスクリプトについては、Veeweeで定義したものを参考にして作成します。
$ mkdir -p ~/mybox/packer/vagrant-debian && cd ~/mybox/packer/vagrant-debian
$ vi config.json
-
JSONファイルの構文チェック
以下のコマンドを実行して、作成したJSONファイルの構文をチェックします。
$ packer validate config.json
punio@PAPA ~ $ mkdir -p ~/mybox/packer/vagrant-debian && cd ~/mybox/packer/vagrant-debian punio@PAPA ~/mybox/packer/vagrant-debian $ packer validate config.json Template validated successfully. punio@PAPA ~/mybox/packer/vagrant-debian $ packer build config.json virtualbox output will be in this color. ==> virtualbox: Downloading or copying Guest additions checksums virtualbox: Downloading or copying: http://download.virtualbox.org/virtualbox/4.2.18/SHA256SUMS ==> virtualbox: Downloading or copying Guest additions virtualbox: Downloading or copying: http://download.virtualbox.org/virtualbox/4.2.18/VBoxGuestAdditions_4.2.18.iso virtualbox: Download progress: 76% ==> virtualbox: Downloading or copying ISO virtualbox: Downloading or copying: http://cdimage.debian.org/debian-cd/7.2.0/i386/iso-cd/debian-7.2.0-i386-netinst.iso virtualbox: Download progress: 0% virtualbox: Download progress: 5% virtualbox: Download progress: 8% virtualbox: Download progress: 13% virtualbox: Download progress: 18% virtualbox: Download progress: 25% virtualbox: Download progress: 35% virtualbox: Download progress: 41% virtualbox: Download progress: 45% -
Boxの作成
JSONファイルの構文チェックが終了したら、以下のコマンドを実行して、Boxを作成します。
$ packer build config.json
JSONファイルの中で、Vagrant Boxの出力先を/export/vagrantに指定していますので、buildが終了すると指定したフォルダにBoxが作成されます。
    virtualbox: Starting the VirtualBox Guest Additions ...done.
    virtualbox: Installing the Window System drivers ...fail!
    virtualbox: (Could not find the X.Org or XFree86 Window System.)
==> virtualbox: Provisioning with shell script: cleanup.sh
==> virtualbox: Gracefully halting virtual machine...
    virtualbox:
    virtualbox: The system is going down for system halt NOW!
==> virtualbox: Preparing to export machine...
    virtualbox: Deleting forwarded port mapping for SSH (host port 4077)
==> virtualbox: Exporting virtual machine...
==> virtualbox: Unregistering and deleting virtual machine...
==> virtualbox: Running post-processor: vagrant
==> virtualbox (vagrant): Creating Vagrant box for 'virtualbox' provider
    virtualbox (vagrant): Copying: output-virtualbox\packer-vagrant-debian-disk1.vmdk
    virtualbox (vagrant): Copying: output-virtualbox\packer-vagrant-debian.ovf
    virtualbox (vagrant): Renaming the OVF to box.ovf...
    virtualbox (vagrant): Compressing box...
    virtualbox (vagrant): Compressing: Vagrantfile
    virtualbox (vagrant): Compressing: box.ovf
    virtualbox (vagrant): Compressing: metadata.json
    virtualbox (vagrant): Compressing: packer-vagrant-debian-disk1.vmdk
Build 'virtualbox' finished.

==> Builds finished. The artifacts of successful builds are:
--> virtualbox: 'virtualbox' provider box: /export/vagrant/packer-vagrant-debian.box
"post-processors": [{ "type": "vagrant", "output": "/export/vagrant/packer-vagrant-debian.box" }]
Vagrant Boxの起動
ここまでの作業で、プロビジョニングの対象となるBoxがVagrantで起動できるようになりましたので、作成したBoxを以下の手順で起動します。
ここでは、Veeweeで作成したBoxの起動方法を解説しますが、Packerで作成したBoxも同様の手順で起動できます。
-
vagrant init
以下のコマンドを実行して、Vagrantを初期化します。
$ mkdir -p ~/mybox/vagrant/veewee-vagrant-debian && cd ~/mybox/vagrant/veewee-vagrant-debian
$ vagrant init veewee-vagrant-debian
punio@PAPA ~
$ mkdir -p ~/mybox/vagrant/packer-vagrant-debian && cd ~/mybox/vagrant/packer-vagrant-debian

punio@PAPA ~/mybox/vagrant/packer-vagrant-debian
$ vagrant init packer-vagrant-debian
A `Vagrantfile` has been placed in this directory. You are now
ready to `vagrant up` your first virtual environment! Please read
the comments in the Vagrantfile as well as documentation on
`vagrantup.com` for more information on using Vagrant.

punio@PAPA ~/mybox/vagrant/packer-vagrant-debian
$ vi Vagrantfile
-
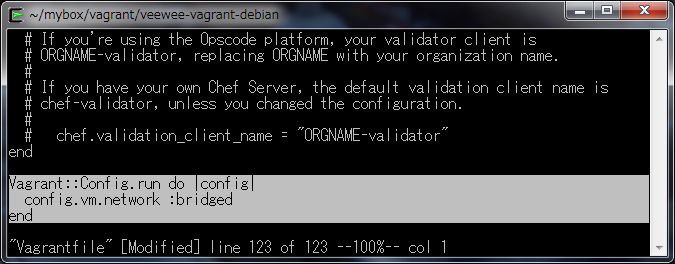
ブリッジネットワークの追加
initコマンドを実行して作成されたVagrantfileに、下記の内容を追加します。
Vagrant::Config.run do |config|
  config.vm.network :bridged
end
-
vagrant add
以下のコマンドを実行して、Boxを追加します。
$ vagrant box add veewee-vagrant-debian /export/vagrant/veewee-vagrant-debian.box
-
vagrant up
以下のコマンドを実行して、Boxを起動します。
$ vagrant up
punio@PAPA ~/mybox/vagrant/packer-vagrant-debian
$ vagrant box add packer-vagrant-debian /export/vagrant/packer-vagrant-debian.box
Downloading or copying the box...
Extracting box...ate: 324M/s, Estimated time remaining: --:--:--)
Successfully added box 'packer-vagrant-debian' with provider 'virtualbox'!

punio@PAPA ~/mybox/vagrant/packer-vagrant-debian
$ vagrant up
Bringing machine 'default' up with 'virtualbox' provider...
[default] Importing base box 'packer-vagrant-debian'...
[default] Matching MAC address for NAT networking...
[default] Setting the name of the VM...
[default] Clearing any previously set forwarded ports...
[default] Creating shared folders metadata...
[default] Clearing any previously set network interfaces...
[default] Preparing network interfaces based on configuration...
[default] Forwarding ports...
[default] -- 22 => 2222 (adapter 1)
[default] Booting VM...
[default] Waiting for VM to boot. This can take a few minutes.
[default] VM booted and ready for use!
[default] Configuring and enabling network interfaces...
[default] Mounting shared folders...
[default] -- /vagrant
-
vagrant ssh
以下のコマンドを実行して、Boxに接続します。
$ vagrant ssh
punio@PAPA ~/mybox/vagrant/packer-vagrant-debian
$ vagrant ssh
Linux packer-vagrant-debian 3.2.0-4-686-pae #1 SMP Debian 3.2.51-1 i686
Welcome to your Vagrant-built virtual machine.
Last login: Mon Nov 18 08:59:27 2013 from 10.0.2.2
vagrant@packer-vagrant-debian:~$
vagrant@packer-vagrant-debian:~$ sudo ifconfig -a
eth0      Link encap:Ethernet  HWaddr 08:00:27:98:28:74
          inet addr:10.0.2.15  Bcast:10.0.2.255  Mask:255.255.255.0
          inet6 addr: fe80::a00:27ff:fe98:2874/64 Scope:Link
          UP BROADCAST RUNNING MULTICAST  MTU:1500  Metric:1
          RX packets:547 errors:0 dropped:0 overruns:0 frame:0
          TX packets:415 errors:0 dropped:0 overruns:0 carrier:0
          collisions:0 txqueuelen:1000
          RX bytes:54784 (53.5 KiB)  TX bytes:45124 (44.0 KiB)

eth1      Link encap:Ethernet  HWaddr 08:00:27:ef:cf:2e
          inet addr:192.168.0.130  Bcast:192.168.0.255  Mask:255.255.255.0
          inet6 addr: 2408:52:6417:0:a00:27ff:feef:cf2e/64 Scope:Global
          inet6 addr: fe80::a00:27ff:feef:cf2e/64 Scope:Link
          UP BROADCAST RUNNING MULTICAST  MTU:1500  Metric:1
          RX packets:8 errors:0 dropped:0 overruns:0 frame:0
          TX packets:8 errors:0 dropped:0 overruns:0 carrier:0
          collisions:0 txqueuelen:1000
          RX bytes:1818 (1.7 KiB)  TX bytes:1180 (1.1 KiB)

lo        Link encap:Local Loopback
          inet addr:127.0.0.1  Mask:255.0.0.0
          inet6 addr: ::1/128 Scope:Host
          UP LOOPBACK RUNNING  MTU:16436  Metric:1
          RX packets:0 errors:0 dropped:0 overruns:0 frame:0
          TX packets:0 errors:0 dropped:0 overruns:0 carrier:0
          collisions:0 txqueuelen:0
          RX bytes:0 (0.0 B)  TX bytes:0 (0.0 B)
vagrant@packer-vagrant-debian:~$
プロビジョニングの準備
ここまでの作業で、プロビジョニングの対象となるBoxが起動しましたので、プロビジョニングの事前準備を行います。
以下の手順で、プロビジョニングの事前準備を行います。
-
管理者認証鍵の作成
以下のコマンドを実行して、Windows上で管理者認証鍵を作成します。
$ ssh-keygen -t rsa -N "" -f ~/.ssh/admin_rsa_key
$ ssh-keygen -t rsa -N "" -f ~/.ssh/admin_rsa_key
Generating public/private rsa key pair.
Your identification has been saved in /home/punio/.ssh/admin_rsa_key.
Your public key has been saved in /home/punio/.ssh/admin_rsa_key.pub.
The key fingerprint is:
1c:80:af:86:03:49:ac:0d:7d:bf:d0:88:4e:64:06:33 punio@PAPA
The key's randomart image is:
+--[ RSA 2048]----+
|Eo   ..          |
|.== o  .         |
|oB o =  .        |
|+ + o +. .       |
| + . o .S        |
|  + o .          |
|   o             |
|                 |
|                 |
+-----------------+

punio@PAPA ~
$ ls ~/.ssh/admin*
/home/punio/.ssh/admin_rsa_key  /home/punio/.ssh/admin_rsa_key.pub
-
管理者認証鍵の転送
以下のコマンドを実行して、プロビジョニングの対象となるBoxに、管理者認証鍵(公開鍵)を転送します。
なお、対象となるBoxに接続してブリッジネットワークのIPアドレスを調べておく必要があります。scp /home/punio/.ssh/admin_rsa_key.pub vagrant@192.168.0.126:/tmp/pub
punio@PAPA ~
$ scp /home/punio/.ssh/admin_rsa_key.pub vagrant@192.168.0.126:/tmp/pub
The authenticity of host '192.168.0.126 (192.168.0.126)' can't be established.
ECDSA key fingerprint is 36:d3:50:d0:d9:17:e7:46:18:73:17:cb:36:8f:f5:bc.
Are you sure you want to continue connecting (yes/no)? yes
Warning: Permanently added '192.168.0.126' (ECDSA) to the list of known hosts.
vagrant@192.168.0.126's password:
admin_rsa_key.pub                             100%  392     0.4KB/s   00:00
-
管理者認証鍵の設定
以下のコマンドを実行して、Boxに接続します。接続の際には、vagrantユーザーのパスワードを入力します。
$ ssh vagrant@192.168.0.126
punio@PAPA ~
$ ssh vagrant@192.168.0.126
vagrant@192.168.0.126's password:
Linux veewee-vagrant-debian 3.2.0-4-686-pae #1 SMP Debian 3.2.51-1 i686

The programs included with the Debian GNU/Linux system are free software;
the exact distribution terms for each program are described in the
individual files in /usr/share/doc/*/copyright.

Debian GNU/Linux comes with ABSOLUTELY NO WARRANTY, to the extent
permitted by applicable law.
Last login: Mon Nov 18 09:53:12 2013
vagrant@veewee-vagrant-debian:~$
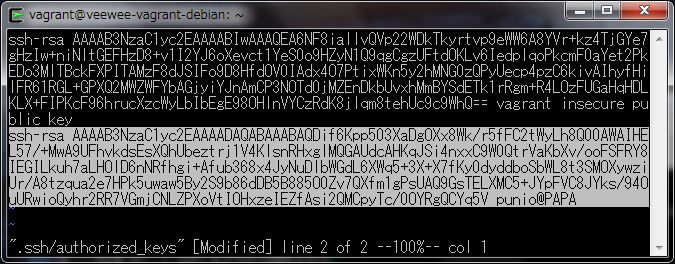
接続したら、~/.ssh/authorized_keysに、先程転送した管理者認証鍵を追加します。
-
BoxへのSSH接続確認
以下のコマンドを実行して、管理者秘密鍵でBoxに接続できるか確認します。
$ ssh -i ~/.ssh/admin_rsa_key vagrant@192.168.0.126
punio@PAPA ~
$ ssh -i ~/.ssh/admin_rsa_key vagrant@192.168.0.126
Last login: Mon Nov 18 10:34:38 2013 from 192.168.0.253
vagrant@veewee-vagrant-debian:~$
パスワード無しで、接続できたら一旦ログアウトして、~/.ssh/ssh_configファイルに下記の内容を追加します。
Host 192.168.0.126
IdentityFile ~/.ssh/admin_rsa_key
User vagrant
編集が終了したら、以下のコマンドを実行してBoxへの接続を確認します。
$ ssh 192.168.0.126
punio@PAPA ~
$ vi ~/.ssh/config

punio@PAPA ~
$ ssh 192.168.0.126
Last login: Mon Nov 18 10:42:48 2013 from 192.168.0.253
vagrant@veewee-vagrant-debian:~$
IPアドレスのみを指定して、パスワード無しでログインできれば成功です。
-
プロビジョニングの初期実行
以下のコマンドを実行して、プロビジョニングの初期実行を行います。
実行すると、BoxにChefをインストールし、BoxがCookbookを実行できる環境をセットアップしますので、忘れずに実行します。
実行が成功すると、指定したIPアドレスでnodeファイルが作成されます。
ここでは、~/chef-repo/nodes/192.168.0.126.jsonファイルが作成されます。$ cd ~/chef-repo $ knife solo prepare 192.168.0.126
punio@PAPA ~/chef-repo
$ knife solo prepare 192.168.0.126
Bootstrapping Chef...
  % Total    % Received % Xferd  Average Speed   Time    Time     Time  Current
                                 Dload  Upload   Total   Spent    Left  Speed
100  6790  100  6790    0     0   1149      0  0:00:05  0:00:05 --:--:--  9713
Downloading Chef 11.8.0 for debian...
Installing Chef 11.8.0
(Reading database ... 38651 files and directories currently installed.)
Preparing to replace chef 11.8.0-1.debian.6.0.5 (using .../chef_11.8.0_i386.deb) ...
Unpacking replacement chef ...
Setting up chef (11.8.0-1.debian.6.0.5) ...
Thank you for installing Chef!
Generating node config 'nodes/192.168.0.126.json'...
なお、prepareコマンドは、必ずchef-repoフォルダ下で実行して下さい。
それ以外のフォルダで実行すると、下記のメッセージが表示されprepareコマンドが失敗します。ERROR: TypeError: can't convert Array into String
-
プロビジョニング実行
以下のコマンドを実行して、プロビジョニングを行います。
prepare直後に、cookコマンドを実行してもrun_listにCookbookが指定されていませんので、BoxでCookbookが実行されることはありません。
成功すると、Cookbookをインストールして実際にプロビジョニングを実行できるようになります。$ knife solo cook 192.168.0.126
ここまでの作業で、プロビジョニングの事前準備は全て完了です。
自作Cookbookの実行
自作Cookbookをインストールして、プロビジョニングを実行します。
以下の手順で、プロビジョニングを行います。
-
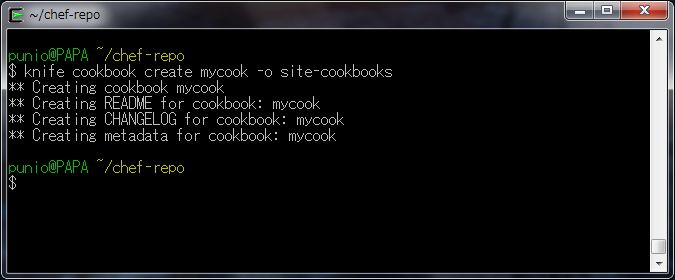
Cookbookの作成
以下のコマンドを実行して、自作Cookbookを作成します。
$ knife cookbook create mycook -o site-cookbooks
-
Recipesの作成
作成されたCookbookのRecipesを編集します。
site-cookbooks/mycook/recipes/default.rbを下記のとおり編集します。package "yum" do action :install end
-
nodeファイルの修正
nodes/192.168.0.126.jsonファイルを、下記のとおり編集します。
{ "run_list":[ "mycook" ] } -
Cookbookの実行
以下のコマンドを実行して、プロビジョニングを実行します。
$ knife solo cook 192.168.0.126
punio@PAPA ~/chef-repo
$ knife solo cook 192.168.0.126
Running Chef on 192.168.0.126...
Checking Chef version...
DL is deprecated, please use Fiddle
Installing Berkshelf cookbooks to 'cookbooks'...
Uploading the kitchen...
Generating solo config...
Running Chef...
Starting Chef Client, version 11.8.0
Compiling Cookbooks...
Converging 1 resources
Recipe: mycook::default
  * package[yum] action install
    - install version 3.2.25-2 of package yum

Chef Client finished, 1 resources updated
公開Cookbookの実行
公開Cookbookをインストールして、プロビジョニングを実行します。
以下の手順で、プロビジョニングを行います。
-
公開Cookbookのインストール
以下のコマンドを実行して、公開Cookbookをインストールします。
$ echo "cookbook 'apache2'" >> Berksfile
$ berks install -p cookbooks
punio@PAPA ~/chef-repo
$ echo "cookbook 'apache2'" >> Berksfile

punio@PAPA ~/chef-repo
$ berks install -p cookbooks
DL is deprecated, please use Fiddle
Installing apache2 (1.8.4) from site: 'http://cookbooks.opscode.com/api/v1/cookbooks
-
nodeファイルの修正
nodes/192.168.0.126.jsonファイルを、下記のとおり編集します。
{ "run_list":[ "mycook" "apache2" ] } -
Cookbookの実行
以下のコマンドを実行して、プロビジョニングを実行します。
$ knife solo cook 192.168.0.126
punio@PAPA ~/chef-repo
$ knife solo cook 192.168.0.126
Running Chef on 192.168.0.126...
Checking Chef version...
DL is deprecated, please use Fiddle
Installing Berkshelf cookbooks to 'cookbooks'...
Using apache2 (1.8.4)
Uploading the kitchen...
Generating solo config...
Running Chef...
Starting Chef Client, version 11.8.0
Compiling Cookbooks...
[2013-11-18T13:45:42+00:00] WARN: Cloning resource attributes for service[apache2] from prior resource (CHEF-3694)
[2013-11-18T13:45:42+00:00] WARN: Previous service[apache2]: /home/vagrant/chef-solo/cookbooks-2/apache2/recipes/default.rb:24:in `from_file'
[2013-11-18T13:45:42+00:00] WARN: Current  service[apache2]: /home/vagrant/chef-solo/cookbooks-2/apache2/recipes/default.rb:210:in `from_file'
Converging 35 resources
Recipe: mycook::default
  * package[yum] action install (up to date)
Recipe: apache2::default
  * package[apache2] action install
    - install version 2.2.22-13 of package apache2

  * service[apache2] action enable (up to date)
  * directory[/etc/apache2/ssl] action create
    - create new directory /etc/apache2/ssl
    - change mode from '' to '0755'
apache2レシピを実行しましたので、以下のコマンドを実行して接続確認を行います。
$ curl http://192.168.0.126/
punio@PAPA ~/chef-repo $ curl http://192.168.0.126/It works!
This is the default web page for this server.
The web server software is running but no content has been added, yet.
以上で、プロビジョニングの実行は終了です。
まとめ
ここまで、3回に渡ってCygwin環境下でプロビジョニングを行う方法について解説しました。導入までの手順は複雑になりましたが、rbenv環境を構築し、chefパッケージを導入してしまえば、Cookbookのインストールだけで、LAN上の仮想マシンだけで無く、物理マシンもプロビジョニングできるようになります。
今回の解説を参考にして、chefプロビジョニングにチャレンジしてみましょう。